Creating the Azure app registrations manually
Glasswall Halo uses Microsoft Entra ID (formerly Azure AD) app registrations to enable Single Sign-On (SSO) for the Portal and bearer-token authentication for the API.
The provided shell script automates the creation of these registrations using the Azure CLI. If you would rather create them by hand—for example, if you do not have access to the Azure CLI, or your organization requires changes to be made through the portal—this page walks through the equivalent steps in the Microsoft Entra admin center.
The result is identical to running the script.
Which registrations do I need?
There are up to three app registrations. Which ones you create depends on what you are enabling:
| App registration | Purpose | Required for |
|---|---|---|
cdrplatform-api-access | Protects the Halo API with bearer-token authentication | API authentication |
cdrplatform-portal-access | Protects the Portal's backend (portal access) service | Portal SSO |
cdrplatform-portal-client | The Portal single-page application that users sign in to | Portal SSO |
- For Portal SSO, create
cdrplatform-portal-accessandcdrplatform-portal-client(this is the equivalent of running the script with--skip-api). - For API authentication only, create
cdrplatform-api-access(the equivalent of--skip-portal). - For a full deployment, create all three.
Create cdrplatform-portal-access before cdrplatform-portal-client, because the client registration references a scope that you expose on the access registration.
Prerequisites
- Access to a Microsoft Entra tenant, with an account that has at least the Cloud Application Administrator role.
- The domain name you intend to use for the Halo Portal (for example,
halo.glasswall.com). This is referred to below as<portal_domain>. - Your Directory (tenant) ID. You can find it on the Microsoft Entra admin center Overview page. It is referred to below as
<tenant_id>.
The script optionally appends a suffix to the registration names and identifier URIs (for example, to host more than one environment in the same tenant). If you need a suffix, append it to every name and Application ID URI below—for example, ar-halo-api-access-dev and api://<tenant_id>/cdrplatform-api-access-dev.
1. cdrplatform-api-access
This registration protects the Halo API. Skip this section if you are only enabling Portal SSO.
Register the application
- Sign in to the Microsoft Entra admin center.
- In the left-hand menu, expand Entra ID and select App registrations, then click New registration.
- Enter the Name
ar-halo-api-access. - Under Supported account types, select Single tenant only -
<your tenant>. - Leave the Redirect URI blank.
- Click Register.
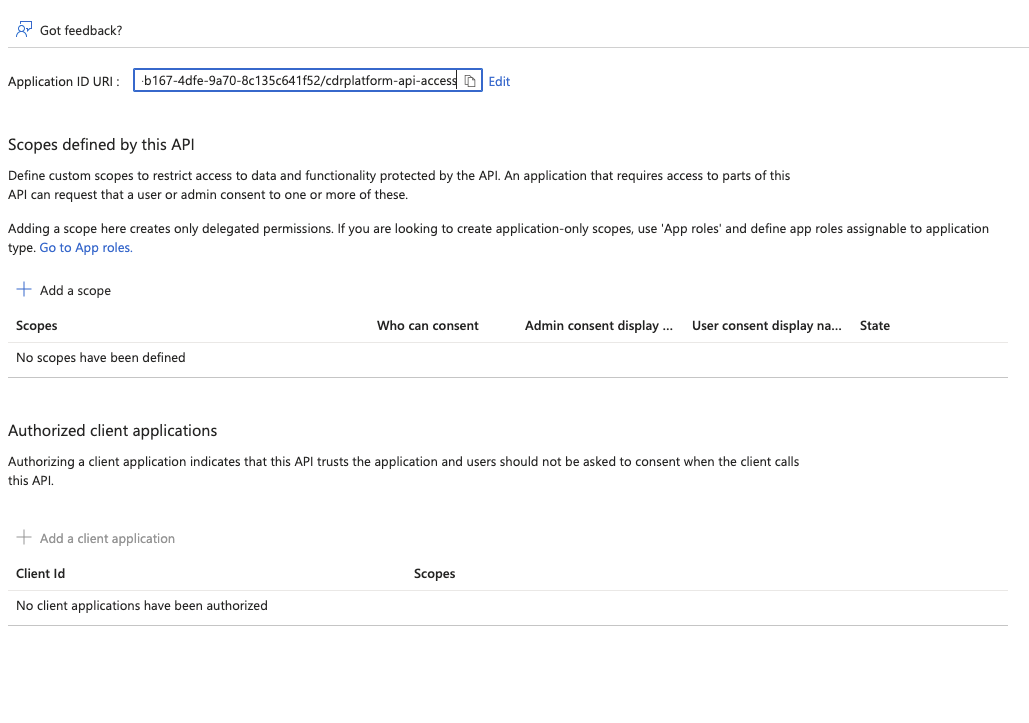
Set the Application ID URI
-
In the registration, go to Expose an API.
-
Next to Application ID URI, click Add (or Set).
-
Replace the default value with:
api://<tenant_id>/cdrplatform-api-access -
Click Save.
Configure API permissions
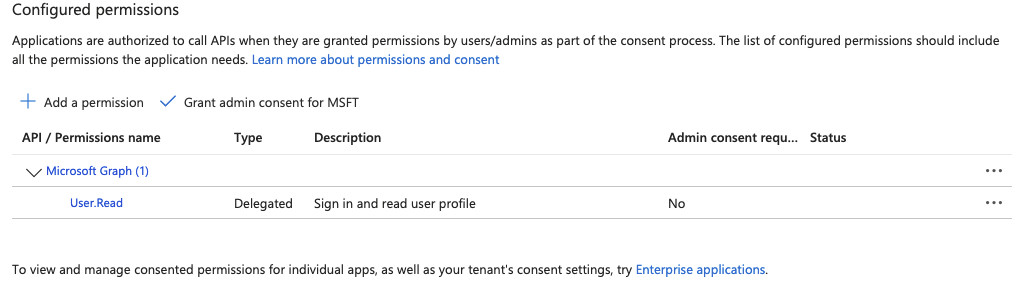
- Go to API permissions.
- Ensure Microsoft Graph > User.Read (delegated) is present. It is added by default on new registrations; if it is missing, click Add a permission > Microsoft Graph > Delegated permissions, search for
User.Read, select it and click Add permissions.
Add app roles
Add two app roles so that users and applications can be granted Admin or User access.
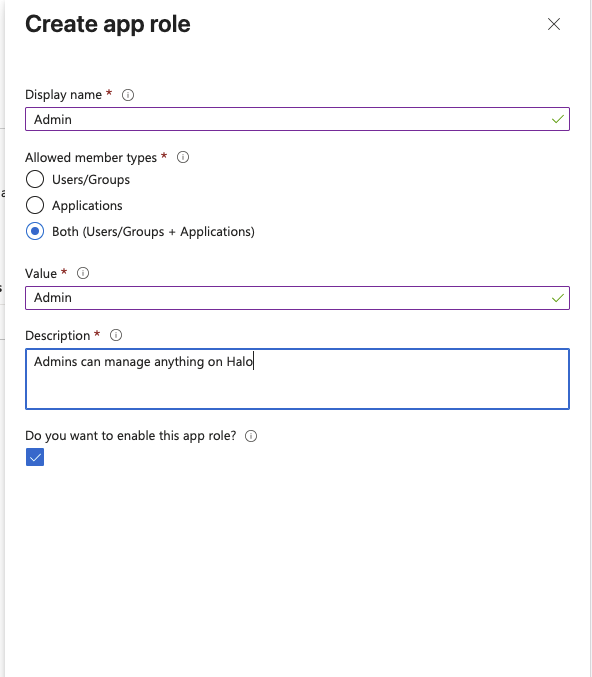
- Go to App roles and click Create app role.
- Create the Admin role with these values:
- Display name:
Admin - Allowed member types: Both (Users/Groups + Applications)
- Value:
Admin - Description:
Admins can manage anything on Halo - Do you want to enable this app role? selected
- Display name:
- Click Apply.
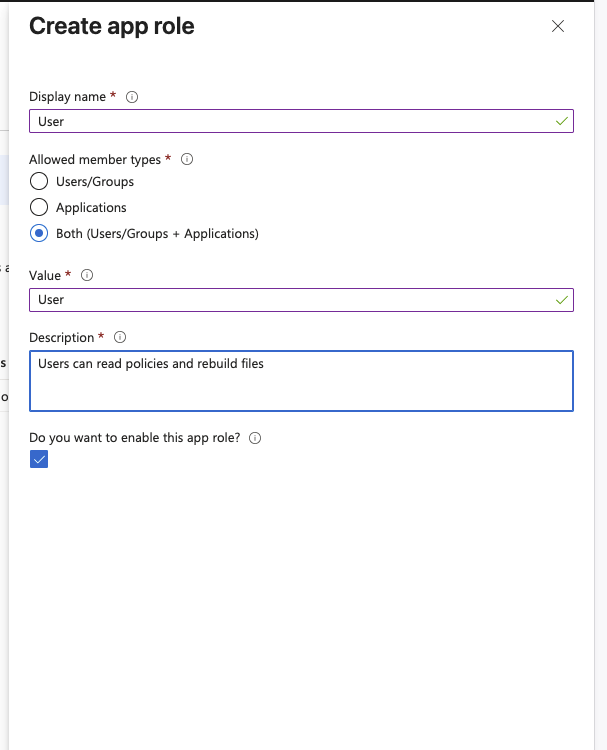
- Click Create app role again and create the User role:
- Display name:
User - Allowed member types: Both (Users/Groups + Applications)
- Value:
User - Description:
Users can read policies and rebuild files - Do you want to enable this app role? selected
- Display name:
- Click Apply.
Registering an application in the portal automatically creates the matching Enterprise application (service principal) in your tenant, so there is no separate step for that. You assign users and groups to the Admin and User roles from the Enterprise application—see Single Sign-On > User roles.
2. cdrplatform-portal-access
This registration protects the Portal's backend portal access service. Skip this section (and section 3) if you are only enabling API authentication.
Register the application
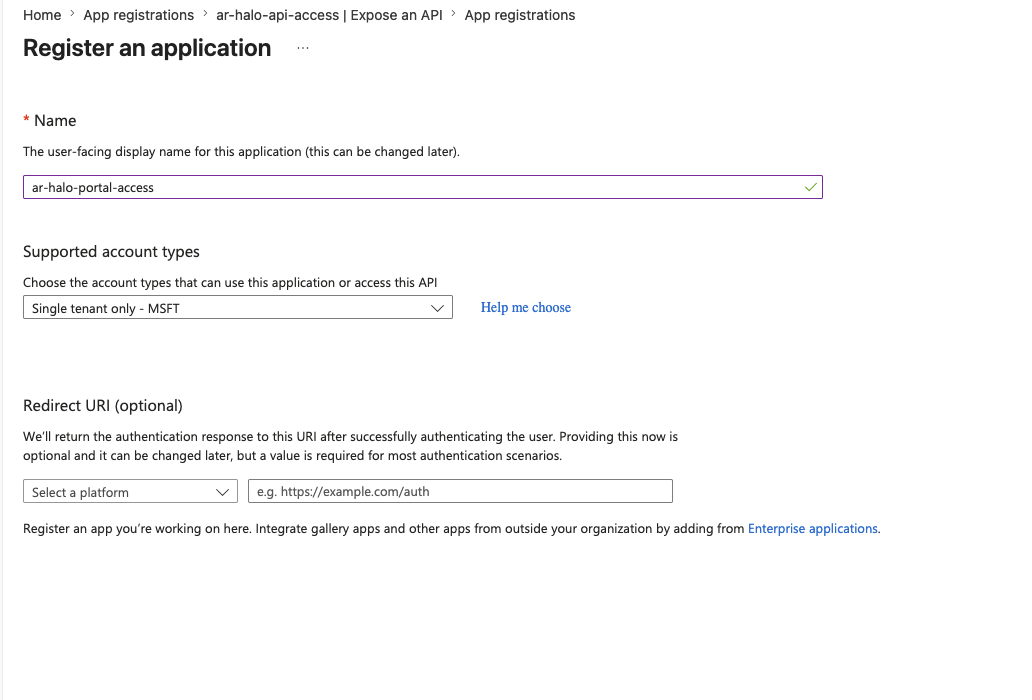
- In App registrations, click New registration.
- Enter the Name
ar-halo-portal-access. - Under Supported account types, select Single tenant only -
<your tenant>. - Leave the Redirect URI blank.
- Click Register.
Set the Application ID URI
-
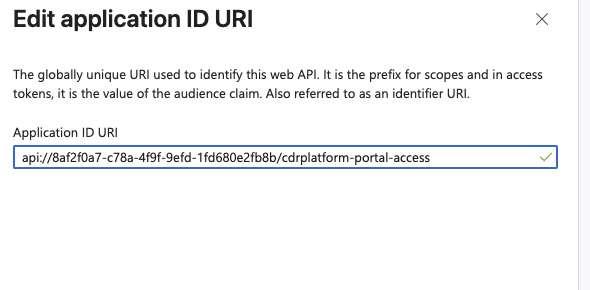
Go to Expose an API.
-
Next to Application ID URI, click Add (or Set) and enter:
api://<tenant_id>/cdrplatform-portal-access -
Click Save.
Expose the PortalUserScope scope
The Portal client registration (created next) needs a delegated scope to call this service on behalf of the signed-in user.
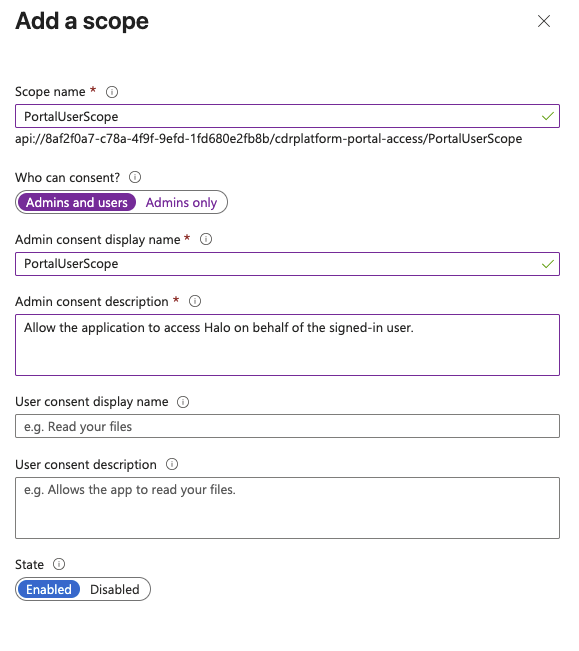
- Still on Expose an API, click Add a scope.
- Enter the following:
- Scope name:
PortalUserScope - Who can consent? Admins and users
- Admin consent display name:
PortalUserScope - Admin consent description:
Allow the application to access Halo on behalf of the signed-in user. - State: Enabled
- Scope name:
- Click Add scope.
Configure API permissions
Ensure Microsoft Graph > User.Read (delegated) is present, as in the API access registration above.
Add app roles
Add the same Admin and User app roles described in section 1, using the identical display names, values, descriptions and Both member types.
3. cdrplatform-portal-client
This is the single-page application (SPA) that users sign in to. Create it after cdrplatform-portal-access.
Register the application
- In App registrations, click New registration.
- Enter the Name
ar-halo-portal-client. - Under Supported account types, select Single tenant only -
<your tenant>. - Leave the Redirect URI blank for now (it is configured below).
- Click Register.
Set the Application ID URI
-
Go to Expose an API.
-
Next to Application ID URI, click Add (or Set) and enter:
api://<tenant_id>/cdrplatform-portal-client -
Click Save.
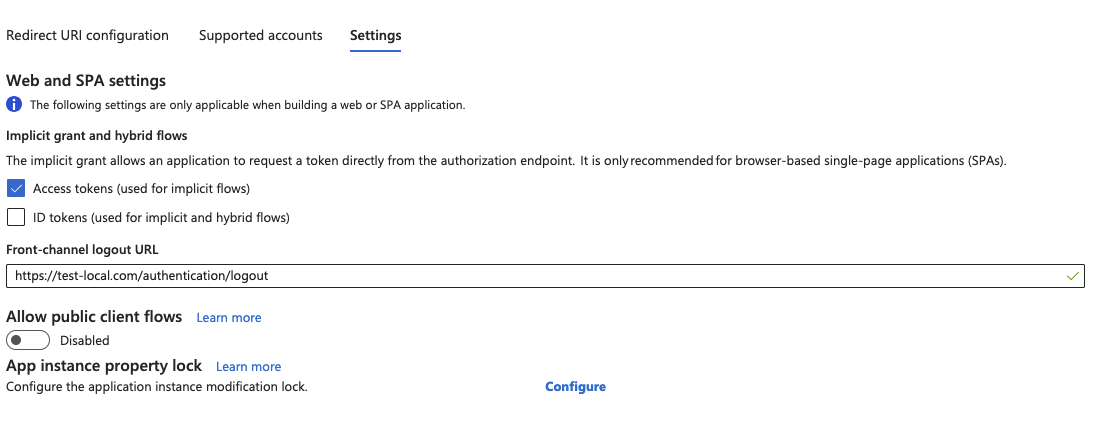
Configure the redirect URI and logout URL
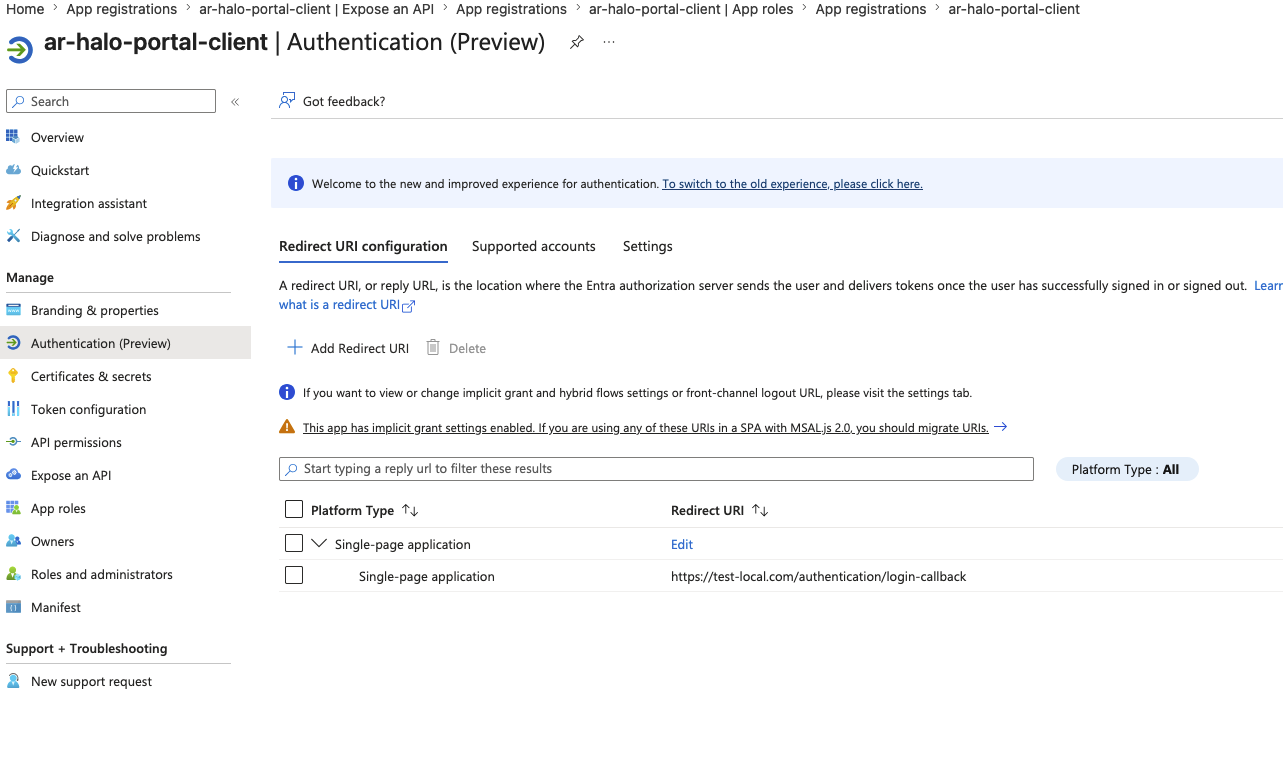
The Portal is a single-page application (SPA), so its redirect URI must be registered under the Single-page application platform. Replace <portal_domain> with your Portal domain (for example, halo.glasswall.com).
-
Go to Authentication.
-
On the Redirect URI configuration tab, click Add Redirect URI.
-
On the Select a platform to add redirect URI pane, select Single-page application and enter the redirect URI:
https://<portal_domain>/authentication/login-callbackClick Configure.
-
Open the Settings tab and set the Front-channel logout URL to:
https://<portal_domain>/authentication/logoutClick Save.
Configure API permissions
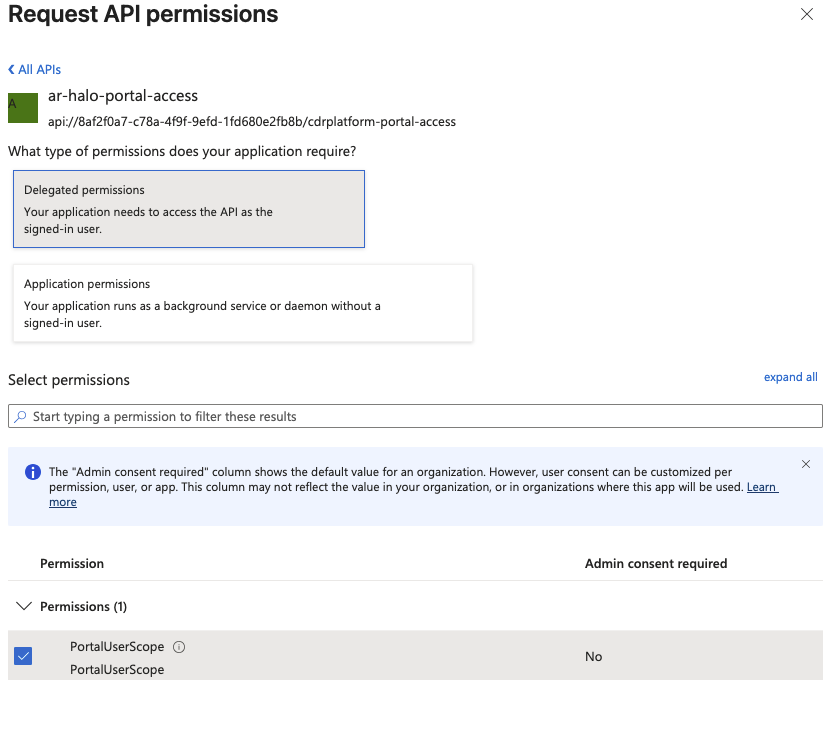
The Portal client needs to sign users in and call the portal access service on their behalf.
- Go to API permissions.
- Ensure Microsoft Graph > User.Read (delegated) is present.
- Click Add a permission > APIs my organization uses, then search for and select ar-halo-portal-access.
- Choose Delegated permissions, select PortalUserScope and click Add permissions.
Grant admin consent
- Still on the API permissions page, click Grant admin consent for
<your tenant>and confirm. - Confirm that the Status column shows a green checkmark for each permission.
Admin consent for the Portal client (ar-halo-portal-client) is required for users to sign in without being prompted to consent individually.
Record the values for deployment
Once the registrations exist, make a note of the following. These are used when you configure SSO and API authentication in the Halo Helm charts (see Single Sign-On).
- Directory (tenant) ID—
<tenant_id> cdrplatform-portal-clientApplication (client) ID—used asportal_client_idcdrplatform-portal-accessApplication (client) ID—used as thevalid_audiencesvalue for the portal access servicecdrplatform-api-accessApplication (client) ID—used as thevalid_audiencesvalue for the API- The Application ID URIs you set:
api://<tenant_id>/cdrplatform-api-accessapi://<tenant_id>/cdrplatform-portal-accessapi://<tenant_id>/cdrplatform-portal-client
You can find each Application (client) ID on the Overview page of the corresponding app registration.