- Glasswall CDR
- Embedded Engine
- About Embedded Engine
- Overview
- Getting Started
- API
- Engine Release Notes
- Release 16.6.0
- Release 16.5.1
- Release 16.5.0
- Release 16.4.0
- Release 16.3.0
- Release 16.2.0
- Release 16.1.0
- Release 16.0.1
- Release 16
- Release 15
- Release 14
- Release 13.1 (beta)
- Release 13
- Release 12
- Release 11
- Release 10
- Release 9
- Release 8
- Release 7
- Release 6
- Release 5.4
- Release 5.3
- Release 5.2
- Release 5.1
- Release 5
- Release 4
- Legacy
- Supporting Tools
- Appendix
- Terms of Service
- Halo
- About Halo
- Glasswall Halo FAQs
- Overview
- Getting Started
- Evaluation via AWS Marketplace
- Evaluation via minikube
- Deployment
- Deployment Overview
- Shared Responsibility Model
- Glasswall Artifact Registry
- Configuration Changes
- Authentication
- AKS
- AKS Setup Guide
- Prerequisites
- Step 1 - Set your Kubernetes context to AKS
- Step 2 - Create Glasswall Halo namespace
- Step 3 - Add secrets in Key Vault
- Step 4 - Enable your AKS cluster to access Key Vault
- Step 5 - Enable access to Glasswall's Artifact Registry
- Step 6 - Pull Helm charts
- Step 7 - Install and configure prerequisite components
- Step 8 - Install CDR components
- Amazon EC2
- EKS
- EKS Setup Guide
- Prerequisites
- Step 1 - Set your Kubernetes context to EKS
- Step 2 - Create Glasswall Halo namespace
- Step 3 - Create secrets in Secrets Manager
- Step 4 - Enable access to Glasswall's Artifact Registry
- Step 5 - Pull Helm charts
- Step 6 - Install and configure prerequisite components
- Step 7 - Install CDR components
- GKE
- GKE Setup Guide
- Prerequisites
- Step 1 - Set your Kubernetes context to GKE
- Step 2 - Create Glasswall Halo namespace
- Step 3 - Enable your GKE cluster to access Secrets
- Step 4 - Manage Secrets
- Step 5 - Enable access to Glasswall's Artifact Registry
- Step 6 - Pull Helm charts
- Step 7 - Install and configure prerequisite components
- Step 8 - Install CDR components
- OKE
- Single Node VM
- License Management
- Functionality
- Using Halo
- Halo Release Notes
- v2.7.2
- v2.7.1
- v2.7.0
- v2.6.2
- v2.6.1
- v2.6.0
- v2.5.4
- v2.5.3
- v2.5.2
- v2.5.1
- v2.5.0
- v2.4.15
- v2.4.13
- v2.4.12
- v2.4.11
- v2.4.10
- v2.4.9
- v2.4.8
- v2.4.7
- v2.4.6
- v2.4.5
- v2.4.4
- v2.4.3
- v2.4.2
- v2.4.1
- v2.4.0
- v2.3.0
- v2.2.1
- v2.2.0
- V2.1.4
- v2.1.3
- v2.1.2
- v2.1.1
- v2.1.0
- v2.0.7
- V2.0.6
- V2.0.5
- v2.0.4
- v2.0.3
- v2.0.2
- Single Node VM
- v2.7.2 RHEL9.4 RKE1.28.10+rke2r1 [Full]
- v2.7.0 RHEL9.4 RKE1.28.10+rke2r1 [Full]
- v2.6.2 RHEL9.4 RKE1.28.10+rke2r1 [Full]
- v2.6.1 RHEL9.4 RKE1.28.10+rke2r1 [Full]
- v2.6.0 RHEL9.4 RKE1.28.10+rke2r1 [Full]
- v2.5.4 RHEL9.4 RKE1.28.10+rke2r1 [Full]
- v2.5.3 RHEL9.4 RKE1.28.10+rke2r1 [Full]
- v2.5.2 RHEL9.4 RKE1.28.10+rke2r1 [Full]
- v2.5.1 RHEL9.4 RKE1.28.10+rke2r1 [Full]
- v2.4.13 RHEL8.8 RKE1.25.9+rke2r1 [Full]
- v2.4.12 RHEL8.8 RKE1.25.9+rke2r1 [Full]
- v2.4.11 RHEL8.8 RKE1.25.9+rke2r1 [Full]
- v2.4.10 RHEL8.8 RKE1.25.9+rke2r1 [Full]
- v2.4.9 RHEL8.8 RKE1.25.9+rke2r1 [Full]
- v2.4.8 RHEL8.8 RKE1.25.9+rke2r1 [Full]
- v2.4.7 RHEL8.8 RKE1.25.9+rke2r1 [Full]
- v2.4.5 RHEL8.8 RKE1.25.9+rke2r1 [Full]
- v2.4.5 RHEL8.8 RKE1.25.9+rke2r1
- v2.4.4 RHEL8.8 RKE1.25.9+rke2r1
- v2.4.4 RHEL8.8 RKE1.25.9+rke2r1 [Full]
- v2.3.0 RHEL8.8 RKE1.25.9+rke2r1
- v2.2.1 RHEL8.8 RKE1.25.9+rke2r1
- Appendix
- Terms of Service
- Constellations
- About Constellations
- Constellations FAQs
- Overview
- Getting Started
- Architecture
- Deployment
- Glasswall Artifact Registry
- AKS
- AKS Setup Guide
- Prerequisites
- Step 1 - Set your Kubernetes context to AKS
- Step 2 - Create namespaces
- Step 3 - Add secrets in Key Vault
- Step 4 - Enable your AKS cluster to access Key Vault
- Step 5 - Enable access to Glasswall's Artifact Registry
- Step 6 - Pull Helm charts
- Step 7 - Install and configure prerequisite components
- Step 8 - Install Glasswall Halo services
- Step 9 - Install Constellations components
- Constellations Release Notes
- Terms of Service
- Performance
- Meteor
- About Meteor
- Meteor Versions
- Getting Started
- Using Meteor
- Meteor Connect
- About Meteor Connect
- Minimum Requirements
- Install Glasswall Meteor Connect
- User Interface
- Preferences
- File Versions
- Support
- Storage Protocols
- Connect Mode
- Meteor Connect Release Notes
- Cloud Folders
- Meteor Release Notes
- Appendix
- Terms of Service
- Glasswall REST APIs
- Glasswall Research
- PDF
Dropbox
- PDF
Access your Dropbox without syncing to your computer.
Connecting
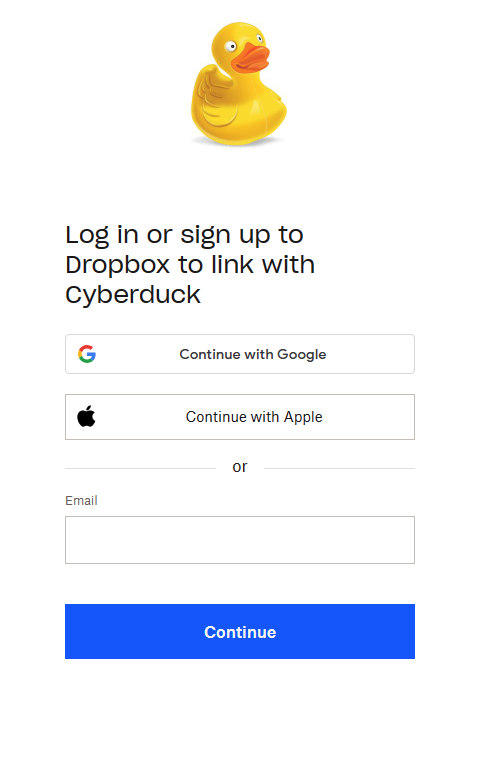
- You will be asked to link Cyberduck (alternative name to Glasswall Meteor Connect) to your Dropbox account on your first connection attempt.
Log in to Dropbox and grant permissions to Cyberduck.
The authorization code will be submitted to Cyberduck automatically.
You can connect to multiple accounts at the same time. Create a new bookmark for every account and run through the OAuth flow. Make sure to log out in your browser prior to setting up a new bookmark to make sure the new bookmark is linked to a newly authenticated account.
Reset OAuth Tokens
If you have accidentally logged in with the wrong Dropbox Account or want to change the login of the Dropbox bookmark delete the current bookmark and create a new one to start a new authentication flow. Alternatively, you can reset the OAuth token by deleting the entries related to duck:dropbox?user=(user)
out of the Windows Credential Manager .
Features
Shared Folders
If you want to access folders that are shared with you through Dropbox you have to add the desired folder to your own drive at the webpage of Dropbox. To do that, open your Dropbox Account within a web browser and navigate to the Shared section. Add the desired file or folder to your own drive by clicking on the Add button beside the file or folder.
Versions
- A list of file versions can be viewed in the Versions tab of the Info window. Files can be reverted to a chosen version of this list.
Share & Request Files
You can share an URL to provide access to a document in your Dropbox from File → Share…. Optionally set a password required to download the file. Request others to add files to your Dropbox with File → Request Files….
Note. - Password protected share links are only available for [paid business plans](https://help.dropbox.com/share/set-link-permissions).
Known Limitations
Comparison with Dropbox desktop app
The Dropbox desktop app has the following advantages to improve upload performance not available through the public API.
- Server side caching to skip transferring previously uploaded files (#247).
- Binary diff uploads transferring only changed contents within a single file.
Modification Date
The modification date retention is supported for new files uploaded but without the option to adjust the modification date later.
Restricted Content
Downloads may fail with a 409 Conflict (restricted_content)
error reply for files considered restricted.
Attention - The file cannot be transferred because the content is restricted. For example, sometimes there are legal restrictions due to copyright claims.
Will not save the file or folder because of its name.
Uploads may fail with a 409 (disallowed_name)
error reply for files with certain characters in the filename.