- Glasswall CDR
- Embedded Engine
- About Embedded Engine
- Overview
- Getting Started
- API
- Engine Release Notes
- Release 16.5.1
- Release 16.5.0
- Release 16.4.0
- Release 16.3.0
- Release 16.2.0
- Release 16.1.0
- Release 16.0.1
- Release 16
- Release 15
- Release 14
- Release 13.1 (beta)
- Release 13
- Release 12
- Release 11
- Release 10
- Release 9
- Release 8
- Release 7
- Release 6
- Release 5.4
- Release 5.3
- Release 5.2
- Release 5.1
- Release 5
- Release 4
- Legacy
- Supporting Tools
- Appendix
- Terms of Service
- Halo
- About Halo
- Glasswall Halo FAQs
- Overview
- Getting Started
- Evaluation via AWS Marketplace
- Evaluation via minikube
- Deployment
- Deployment Overview
- Shared Responsibility Model
- Glasswall Artifact Registry
- Configuration Changes
- Authentication
- AKS
- AKS Setup Guide
- Prerequisites
- Step 1 - Set your Kubernetes context to AKS
- Step 2 - Create Glasswall Halo namespace
- Step 3 - Add secrets in Key Vault
- Step 4 - Enable your AKS cluster to access Key Vault
- Step 5 - Enable access to Glasswall's Artifact Registry
- Step 6 - Pull Helm charts
- Step 7 - Install and configure prerequisite components
- Step 8 - Install CDR components
- Amazon EC2
- EKS
- EKS Setup Guide
- Prerequisites
- Step 1 - Set your Kubernetes context to EKS
- Step 2 - Create Glasswall Halo namespace
- Step 3 - Create secrets in Secrets Manager
- Step 4 - Enable access to Glasswall's Artifact Registry
- Step 5 - Pull Helm charts
- Step 6 - Install and configure prerequisite components
- Step 7 - Install CDR components
- GKE
- GKE Setup Guide
- Prerequisites
- Step 1 - Set your Kubernetes context to GKE
- Step 2 - Create Glasswall Halo namespace
- Step 3 - Enable your GKE cluster to access Secrets
- Step 4 - Manage Secrets
- Step 5 - Enable access to Glasswall's Artifact Registry
- Step 6 - Pull Helm charts
- Step 7 - Install and configure prerequisite components
- Step 8 - Install CDR components
- OKE
- Single Node VM
- License Management
- Functionality
- Using Halo
- Halo Release Notes
- v2.7.2
- v2.7.1
- v2.7.0
- v2.6.2
- v2.6.1
- v2.6.0
- v2.5.4
- v2.5.3
- v2.5.2
- v2.5.1
- v2.5.0
- v2.4.15
- v2.4.13
- v2.4.12
- v2.4.11
- v2.4.10
- v2.4.9
- v2.4.8
- v2.4.7
- v2.4.6
- v2.4.5
- v2.4.4
- v2.4.3
- v2.4.2
- v2.4.1
- v2.4.0
- v2.3.0
- v2.2.1
- v2.2.0
- V2.1.4
- v2.1.3
- v2.1.2
- v2.1.1
- v2.1.0
- v2.0.7
- V2.0.6
- V2.0.5
- v2.0.4
- v2.0.3
- v2.0.2
- Single Node VM
- v2.7.2 RHEL9.4 RKE1.28.10+rke2r1 [Full]
- v2.7.0 RHEL9.4 RKE1.28.10+rke2r1 [Full]
- v2.6.2 RHEL9.4 RKE1.28.10+rke2r1 [Full]
- v2.6.1 RHEL9.4 RKE1.28.10+rke2r1 [Full]
- v2.6.0 RHEL9.4 RKE1.28.10+rke2r1 [Full]
- v2.5.4 RHEL9.4 RKE1.28.10+rke2r1 [Full]
- v2.5.3 RHEL9.4 RKE1.28.10+rke2r1 [Full]
- v2.5.2 RHEL9.4 RKE1.28.10+rke2r1 [Full]
- v2.5.1 RHEL9.4 RKE1.28.10+rke2r1 [Full]
- v2.4.13 RHEL8.8 RKE1.25.9+rke2r1 [Full]
- v2.4.12 RHEL8.8 RKE1.25.9+rke2r1 [Full]
- v2.4.11 RHEL8.8 RKE1.25.9+rke2r1 [Full]
- v2.4.10 RHEL8.8 RKE1.25.9+rke2r1 [Full]
- v2.4.9 RHEL8.8 RKE1.25.9+rke2r1 [Full]
- v2.4.8 RHEL8.8 RKE1.25.9+rke2r1 [Full]
- v2.4.7 RHEL8.8 RKE1.25.9+rke2r1 [Full]
- v2.4.5 RHEL8.8 RKE1.25.9+rke2r1 [Full]
- v2.4.5 RHEL8.8 RKE1.25.9+rke2r1
- v2.4.4 RHEL8.8 RKE1.25.9+rke2r1
- v2.4.4 RHEL8.8 RKE1.25.9+rke2r1 [Full]
- v2.3.0 RHEL8.8 RKE1.25.9+rke2r1
- v2.2.1 RHEL8.8 RKE1.25.9+rke2r1
- Appendix
- Terms of Service
- Constellations
- About Constellations
- Constellations FAQs
- Overview
- Getting Started
- Architecture
- Deployment
- Glasswall Artifact Registry
- AKS
- AKS Setup Guide
- Prerequisites
- Step 1 - Set your Kubernetes context to AKS
- Step 2 - Create namespaces
- Step 3 - Add secrets in Key Vault
- Step 4 - Enable your AKS cluster to access Key Vault
- Step 5 - Enable access to Glasswall's Artifact Registry
- Step 6 - Pull Helm charts
- Step 7 - Install and configure prerequisite components
- Step 8 - Install Glasswall Halo services
- Step 9 - Install Constellations components
- Constellations Release Notes
- Terms of Service
- Performance
- Meteor
- About Meteor
- Meteor Versions
- Getting Started
- Using Meteor
- Meteor Connect
- About Meteor Connect
- Minimum Requirements
- Install Glasswall Meteor Connect
- User Interface
- Preferences
- File Versions
- Support
- Storage Protocols
- Connect Mode
- Meteor Connect Release Notes
- Cloud Folders
- Meteor Release Notes
- Appendix
- Terms of Service
- Glasswall REST APIs
- Glasswall Research
- PDF
Akamai
- PDF
Akamai (CDN) Support
Akamai is the CDN provider for Rackspace Cloudfiles. A container can be enabled for Akamai in the Distribution (CDN) tab of the _Info_panel.
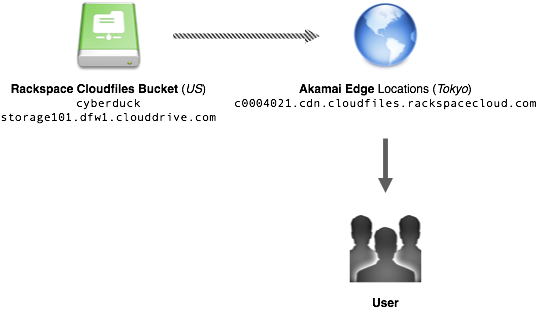
Basic (Download HTTP) Distributions
Used to serve static content. The files you elect to be public are shared out over a content distribution network with locations all over the world. The first time your content is served to a worldwide user (one in Tokyo, for example), a copy of the content will be stored in cache on the edge servers in that location. The next time the content is requested, it's pulled directly from the cached copy on the edge servers, dramatically reducing delivery time.
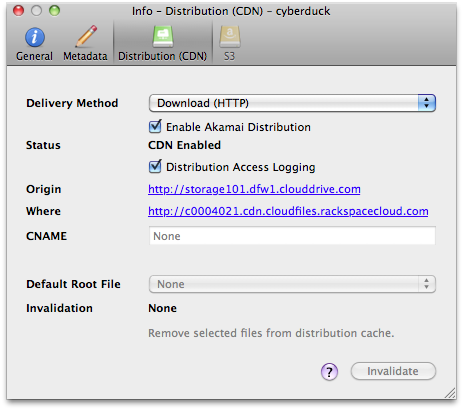
Example Configuration:
Deployment Status
The configuration updates are fully propagated status switches to CDN Enabled.
Distribution Access Logging
When this option is enabled in the File → Info → Distribution (CDN) panel of a container, access logs are written to /.CDN_ACCESS_LOGS
. Use View → Show Hidden Files to access the *.gz
log files.
Invalidation
To force the CDN to refetch the files from the container source, you can invalidate (aka purge) objects from edge locations. Use the Invalidate option File → Info → Distribution (CDN) to remove objects or the entire container from the CDN cache.
Index File
You can assign a default root object for your distribution. This default object will be served when Akamai receives a request for the root of your distribution – i.e., your distribution’s domain name by itself.
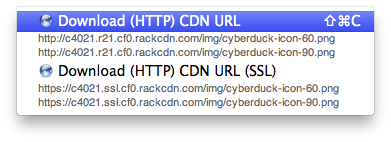
URLs
You can access all URLs (including from CDN configurations) from the menu Edit → Copy URL and File → Open URL.
Note - You must first open *File → Info → Distribution (CDN)* before these URLs are available.