Objective
Set up automated file sanitization in Amazon S3 buckets using Glasswall Halo API via event notification functionality and Lambda functions.
Amazon S3 Integration Guide
- Prerequisites
- Step 1 - Create an S3 bucket
- Step 2 - Create SQS queue
- Step 3 - Turn on event notification
- Step 4 - Create a Lambda function
- Step 5 - Configure execution role
- Step 6 - Upload Lambda code
- Step 7 - Add Trigger
- Step 8 - Test
Prerequisites
-
AWS account and IAM (Identity and Access Management) role with the following permission policies:
- AmazonS3FullAccess: to create and configure the S3 buckets.
- AmazonSQSFullAccess: to create and configure the SQS queue used to trigger.
- AWSLambda_FullAccess: to create and configure the Lambda function that executes a call to Glasswall Halo.
- (Optional) IAMFullAccess: required to create and configure a default execution role for the new function. If this role cannot be assigned, follow the relevant steps in this guide to request creation of a role and then use this pre-created role.
-
Authenticated access to Glasswall Halo's Synchronous API.
Step 1 - Create an S3 bucket
First, you need to create an S3 bucket where the source files are added, and this will be the source of the events which trigger the workflow.
-
Log in to the AWS Management Console.
-
Navigate to the Amazon S3 console by entering “S3” in the search bar or by selecting S3 under the Services > Storage menu.

-
In the left navigation pane, select Buckets.
-
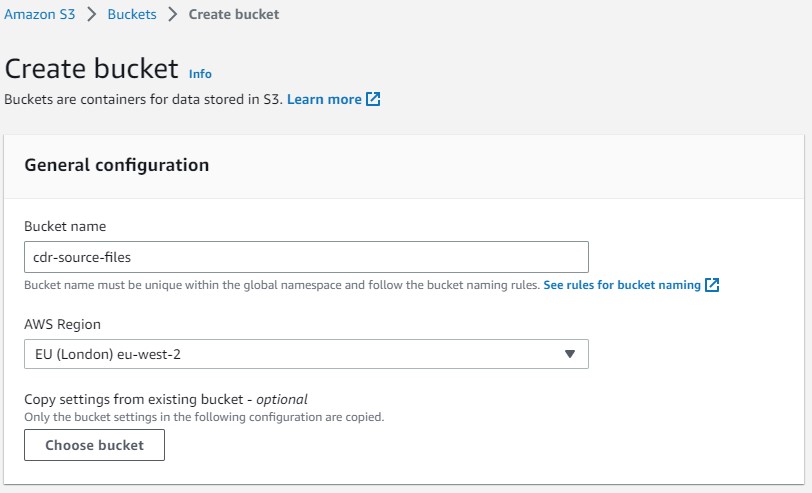
Click Create bucket. The Create bucket page opens.
-
For Bucket name, enter a name for your bucket. The bucket name must:
- Be unique within a partition. A partition is a grouping of Regions; AWS currently has three partitions:
aws(Standard Regions),aws-cn(China Regions), andaws-us-gov(AWS GovCloud (US) Regions). - Be between 3 and 63 characters long.
- Consist only of lowercase letters, numbers, dots (.), and hyphens (-). For best compatibility, we recommend that you avoid using dots (.) in bucket names, except for buckets that are used only for static website hosting.
- Begin and end with a letter or number.
- Be unique within a partition. A partition is a grouping of Regions; AWS currently has three partitions:
Bucket names are globally unique, the AWS console validation will advise you if the entered bucket name is already in use.
Note: after you create the bucket, you cannot change its name. For more information about naming buckets, see Bucket naming rules.
-
For Region, choose the AWS Region where you want the bucket to reside.
Note: to minimize latency and costs and address regulatory requirements, choose a Region close to you. Objects stored in a Region never leave that Region unless you explicitly transfer them to another Region. For a list of Amazon S3 AWS Regions, see AWS service endpoints in the Amazon Web Services General Reference.
If you require any additional settings for your bucket, such as access control, logging, versioning, or encryption, you can configure them accordingly.
Additionally, under the Set permissions section, you can define who has access to the bucket and its objects by choosing from options like bucket policies, access control lists (ACLs), or block all public access. Ensure that you review and set these configurations as per your requirements before proceeding.
For more detailed information about creating and configuring S3 Buckets please refer to the AWS S3 User Guide.
Step 2 - Create SQS queue
After the S3 Bucket is created, the Amazon SQS (Simple Queue Service) queue needs to be created. This is where the event notifications from your source S3 Bucket will be sent, and picked up by the Lambda function.
-
Navigate to the Amazon SQS console by searching for “SQS” in the search bar or by selecting Simple Queue Service under the Services > Application Integration menu.
-
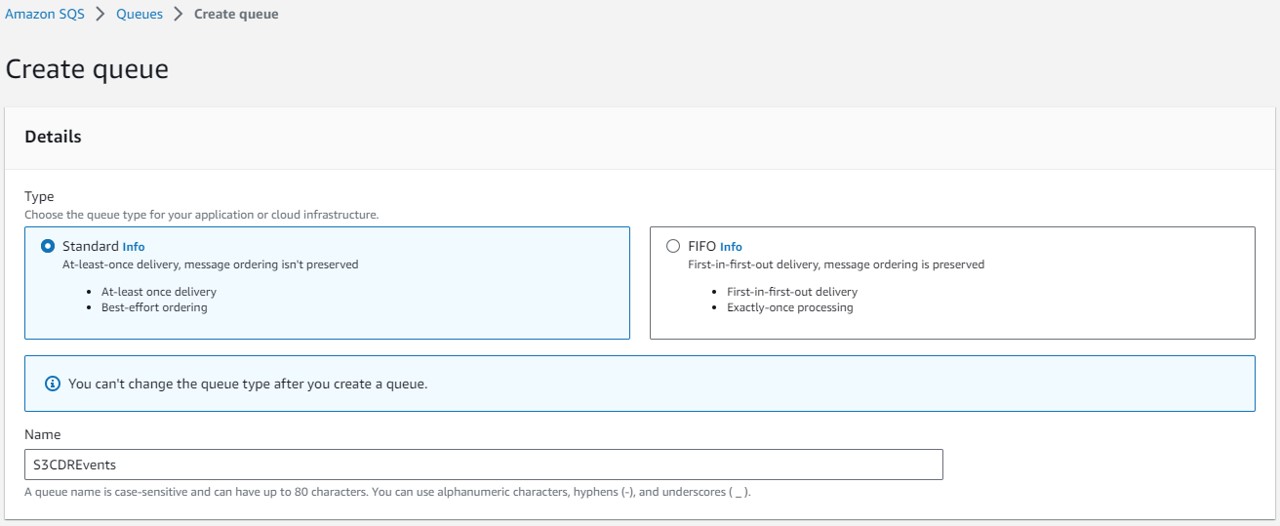
Click Create queue.
-
Choose between the two types of SQS queues: Standard or FIFO.
Standard queues provide high throughput and best-effort ordering, while FIFO queues guarantee “exactly once” processing and strict ordering based on message group ID. The Standard queue type is set by default.
Note: you cannot change the queue type once it has been created.
-
Enter a unique Name for your queue; e.g. S3CDREvents.
The name of a FIFO queue must end with the .fifo suffix. The suffix counts towards the 80-character queue name quota. To determine whether a queue is FIFO, you can check whether the queue name ends with the suffix.
-
The console sets default values for the queue configuration parameters. If you are familiar with SQS, under Configuration you can set new values for the parameters. For the purposes of this use case, we will leave most of these as default.
-
Scroll to the Access policy section.
-
Select the Advanced option to edit the policy JSON via the advanced editor to allow the S3 service to publish messages to the queue.
-
Add a comma after the “__owner_statement” element and paste the following JSON snippet:
{
      "Sid": "AllowS3ToPublish",
      "Effect": "Allow",
      "Principal": {
        "Service": "s3.amazonaws.com"
      },
      "Action": "sqs:SendMessage",
      "Resource": "<ARN-OF-QUEUE>"
 }
Note: ensure that you replace ARN-OF-QUEUE in the snippet with the ARN (Amazon Resource Name) of the queue; this will be the same as the resource ARN of the owner statement in the existing JSON.

-
Review the configuration values you have entered and click Create queue.
Make a note of the ARN for the queue for use later.
For more detailed information about creating and configuring Amazon SQS please refer to the AWS S3 User Guide.
Step 3 - Turn on event notifications
The next step is to turn on the event notification, so that your SQS queue receives a notification every time a file is placed in the source S3 bucket.
-
Navigate to the Amazon S3 console and from the Buckets list, select the bucket you created earlier.
-
From the Bucket overview page, select the Properties tab.
-
Scroll down to the Event Notifications section and click Create event notification.
-
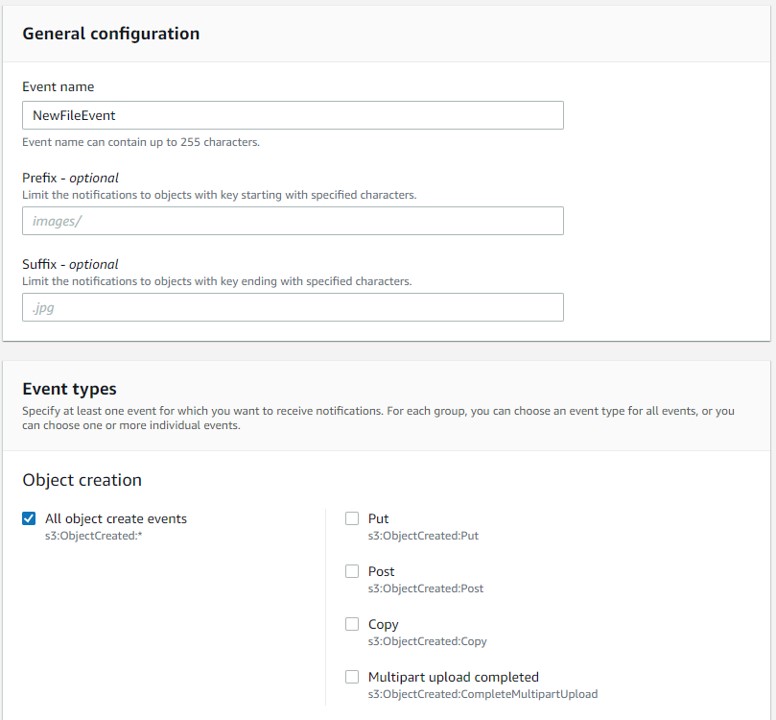
In the General configuration section, specify a descriptive Event name for your event notification. Optionally, you can also specify a Prefix and a Suffix to limit the notifications to objects with keys ending in the specified characters.
-
In the Event types section, you can select one or more event types that you want to receive notifications for. In this example we are focusing on the Object creation events so that new or copied objects result in notifications that result in CDR being actioned on the object.
Select the All object create events checkbox.
- Lastly, in the Destination section, choose the event notification destination – in this case the SQS queue we have created and configured.
Select SQS queue as your destination and pick the SQS queue we created and configured previously.
- Select Save changes, and Amazon S3 sends a test message to the event notification destination.
The event notification is created, and you are returned to the S3 bucket properties.
For more detailed information about event notifications please refer to the AWS S3 User Guide.
Step 4 - Create a Lambda function
Once the event notification has been turned on, you need to create a new Lambda function.
-
Navigate to the Lambda service by searching for “Lambda” in the search bar or by selecting Lambda under the Services > Compute menu.
-
In the left navigation pane, choose Functions.
-
Click Create function.
-
At the Create function page you are presented with three options; select Author from scratch.
-
Enter an appropriate Function name for your Lambda function; e.g. CDR-File.
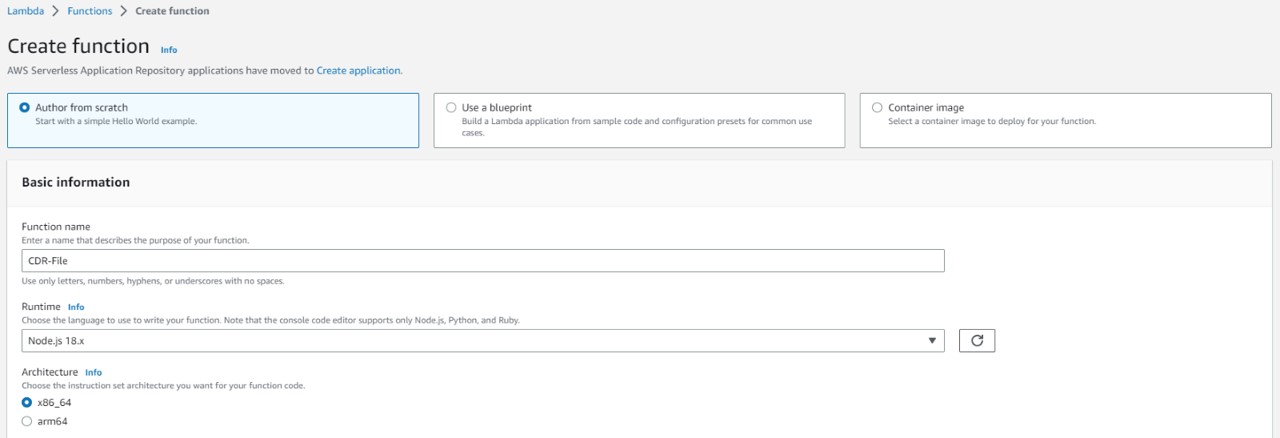
- Next, select a Runtime that matches your intended language.
Note: you can find sample codes via the Glasswall GitHub. You will be able to upload code in a later step.
-
(Optional) If you are familiar with Lambda functions, you can set additional configurations via the General configuration option under the Configurations tab.
-
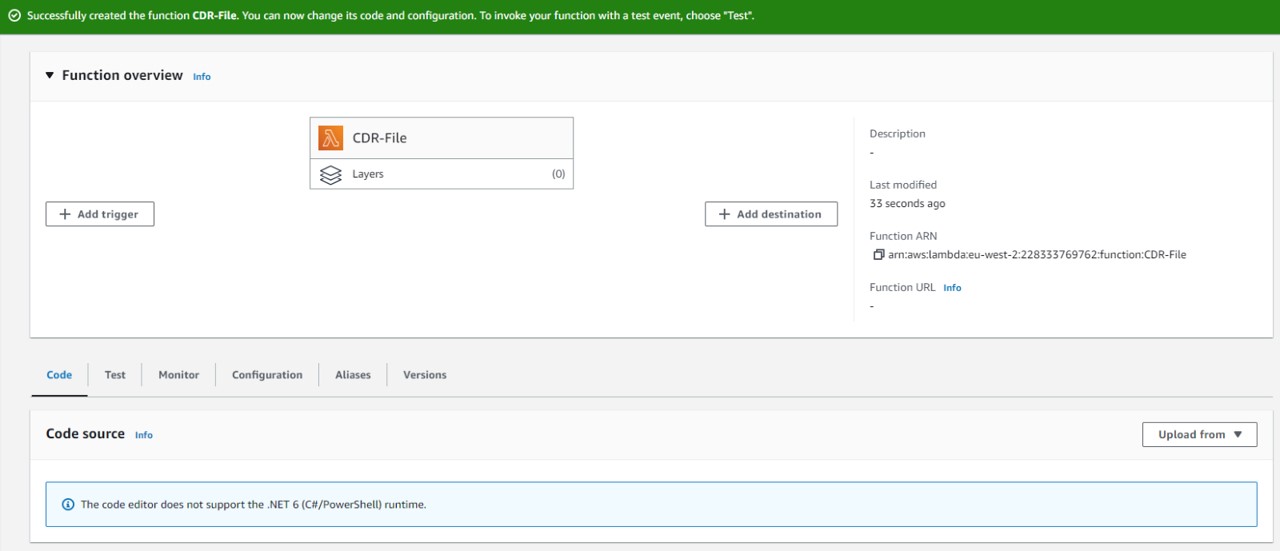
Click Create function. You arrive at the Function overview page.
- Assigning the execution role can be done in two ways:
- Requesting and assigning a new role using IAMFullAccess
- Assigning an already existing role
- This can be done via the Lambda Service: Function overview > Configuration > Permissions > Edit.
[Optional] IAMFullAccess
If you are unable to be assigned IAMFullAccess permissions, please request a role be created with the following permissions:
             logs:CreateLogStream

             logs:PutLogEvents
Provide the completed JSON from the Configure execution role step to your privileged users to create a role.
This new role can be selected from the Lambda creation user interface in place of allowing a new default role to be created.
- Scroll to the Change default execution role section.
- Choose Use an existing role and select the pre-created role.
The next step of configuring the execution role can now be skipped and you can proceed to Step 6 - Upload Lambda code.
Step 5 - Configure execution role
To allow the Lambda function access to the AWS services (S3, SQS), you need to assign additional permissions to the Lambda’s execution role.
-
In the AWS Lambda console, choose Functions in the left navigation pane.
-
On your Lambda function's details page, choose the Configuration tab, and then click Permissions in the left navigation pane.
-
Under Execution role, choose the link of the Role name. The IAM console opens.
-
On the IAM console's Summary page for your Lambda function's execution role, choose the Permissions tab.
-
From the Add permissions menu, select Create inline policy.
-
Switch to the JSON editor.
-
In the snippet below, replace the below section (Resource) with the ARN of the SQS queue you created and noted down from a previous step:
arn:aws:sqs:{Region}:{Account}:{QueueName}"
{
    "Version": "2012-10-17",
    "Statement": [
        {
            "Sid": "UseCaseStatement0",
            "Effect": "Allow",
            "Action": [
                    "sqs:DeleteMessage",
                    "sqs:GetQueueUrl",
                    "sqs:ReceiveMessage",
                    "sqs:GetQueueAttributes",
                    "sqs:ListQueueTags"
            ],
            "Resource": [
                    "arn:aws:sqs:{Region}:{Account}:{QueueName}"
            ]
        },
        {
            "Sid": "UseCaseStatement1",
            "Effect": "Allow",
            "Action": [
                    "sqs:ListDeadLetterSourceQueues",
                    "sqs:ListMessageMoveTasks",
                    "sqs:ListQueues",
                    "s3:GetObject",
                    "s3:CreateBucket",
                    "s3:PutObject"
            ],
            "Resource": "*"
        }
    ]
}
-
Paste the snippet into the JSON editor with the updated resources.
-
Click Next.
-
Give the policy a Name; e.g. UseCasePolicy.
-
Click Create policy.
Your lambda function now has permissions to interact with the services you require.
Step 6 - Upload Lambda code
When files are uploaded to the source S3 bucket, you require some code to be run in order to process them when the Lambda is invoked.
Depending on your framework there are multiple ways to get the Lambda function running the intended code, but this guide focuses on the Zip upload functionality.
The Lambda function is going to have the following logic regardless of framework:
- Retrieve file: interpret the SQS message to retrieve the file from the source bucket.
- CDR file: make an authenticated request to the Glasswall Halo REST API.
- Handle responses: handle responses both successful and unsuccessful.
If you require more information to get started, you can find complete sample codebases that have this logic implemented at the Glasswall Engineering GitHub. This repository provides sample code with instructions on uploading to the Lambda created here. Additionally, there are pre-built zip files that you can use for the Lambda function. Please refer to the instructions within the .md files.
Step 7 - Add Trigger
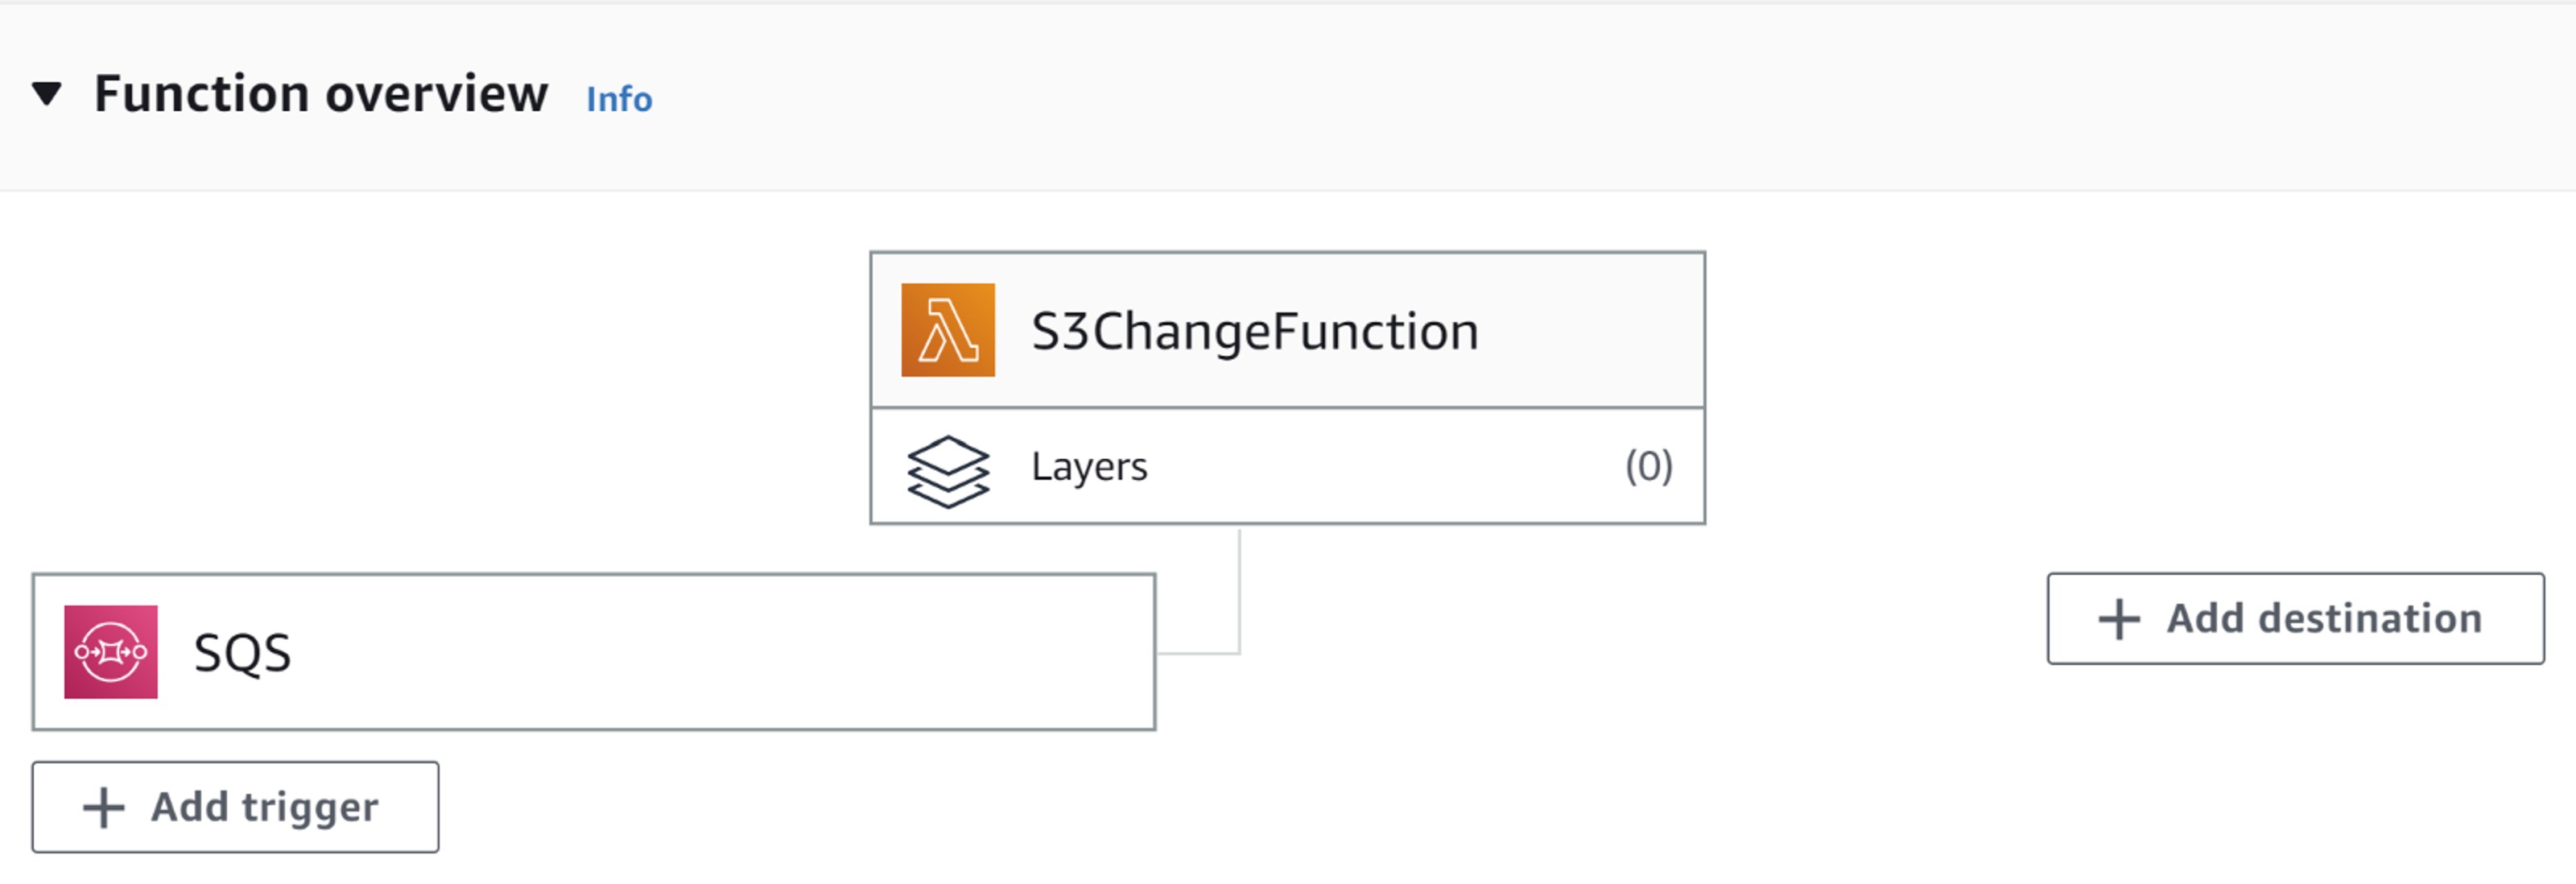
In this step you configure the Lambda function to be invoked when SQS messages are published to the queue by adding a Trigger.
-
In the Function overview pane of your function’s console page, choose Add trigger.
-
From the list of available triggers select SQS.
-
Select the SQS queue you created previously and click Add.
The process is now complete and ready to be tested.
Step 8 - Test
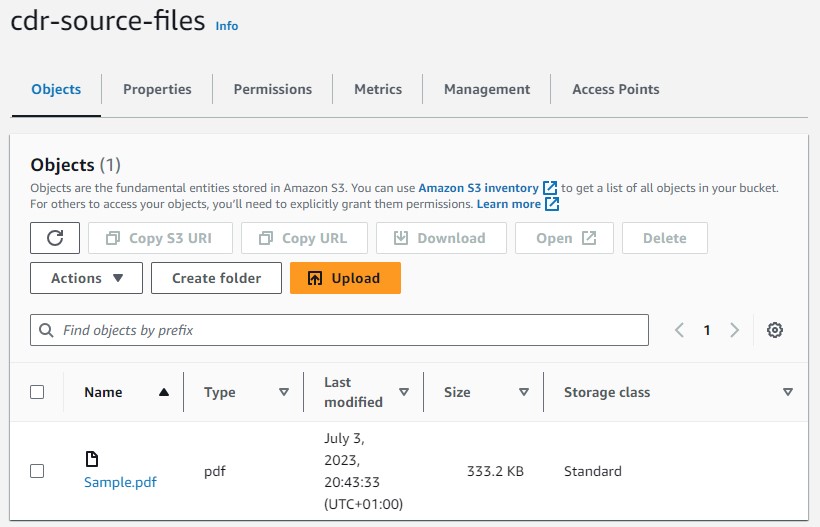
Now that everything is in place, upload a file to the source S3 bucket and within a few seconds a file with the same name will appear in the clean S3 bucket.
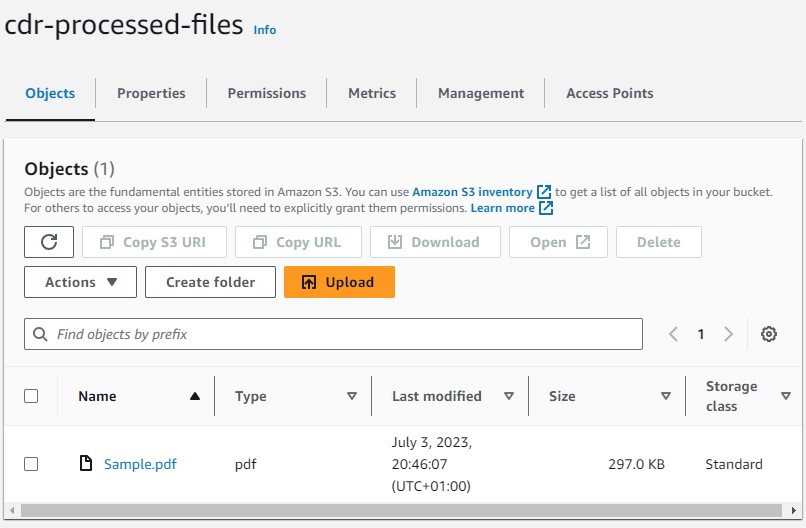
This file is a visually identical clean copy of the original file, without any of the risky content or structural defects which could include malware.
Confirm via Glasswall Clean Room
-
Process the original file using Glasswall's Clean Room application.
- Your file will be given a risk level along with any risky content items or structural defects listed.
-
Process the cleaned file from the clean S3 bucket in the Clean Room application.
- The file should be returned as clean with no risky content or structural defects.